2026-04-14
复习和预习
昨天课堂内容
- 条件测试
- IF 语句
- FOR 语句
- while/until 语句
课前思考
- 开发脚本:已知变量
num=10,判断num值,如果大于 5 且小于 15,则输出"5<num<15"。
#!/bin/bash
num=10
# if [ $num -gt 5 ] && [ $num -lt 15 ];then
# if [ $num -gt 5 -a $num -lt 15 ];then
if ((5<num && num<15));then
  echo "5<num<15"
fi
- 开发脚本:使用if双分支判断sshd是否运行,如果运行则输出active,否则输出inactive。(2分)
#!/bin/bash
if systemctl is-active sshd &>/dev/null;then
  echo active
else
  echo inactive
fi
- 开发脚本:使用for语句重启服务chronyd、rsyslog。(2分)
#!/bin/bash
for service in chronyd rsyslog
do
  systemctl restart $service
done
- 开发脚本:使用while语句实现每隔3秒监控一次sshd服务。(2分)
- 不管服务是否运行,都需要记录服务状态到日志/var/log/sshd_status.log。
- 如果服务未运行,则尝试启动服务,并记录启动结果到/var/log/sshd_status.log。
#!/bin/bash
log_file=/var/log/sshd_status.log
while true
do
  if systemctl is-active sshd &>/dev/null;then
    echo "$(date): sshd is running" >> ${log_file}
  else
    echo "$(date): sshd is not running" >> ${log_file}
    systemctl start sshd
    if systemctl is-active sshd &>/dev/null;then
      echo "$(date): Start sshd success" >> ${log_file}
    else
      echo "$(date): Start sshd fail" >> ${log_file}
    fi
  fi
  sleep 3
done
今天课堂内容
- 正则表达式
- grep/sed/awk
- ansible 环境准备
- ansible 配置
正则表达式
正则表达式概述
- 正则表达式作为一个
pattern,将pattern与要搜索的字符串进行匹配,以便查找一个或多个字符串。 - 正则表达式,自成体系,由普通字符(例如字符 a 到 z)和元字符组成的文字模式。
- 普通字符:没有显式指定为元字符的所有可打印和不可打印字符字符,包括所有大写和小写字母、所有数字、所有标点符号和其他一些符号。
- 元字符:除了普通字符之外的字符。
- 正则表达式,工具(vim、grep、less等)和程序语言(Perl、Python、C等)都使用正则表达式。
正则表达式分类:
- 普通正则表达式
- 扩展正则表示,支持更多的元字符。
环境准备
[laoma@shell ~]$ cat > words <<'EOF'
cat
category
acat
concatenate
cbt
c1t
cCt
c-t
c.t
dog
EOF
普通字符
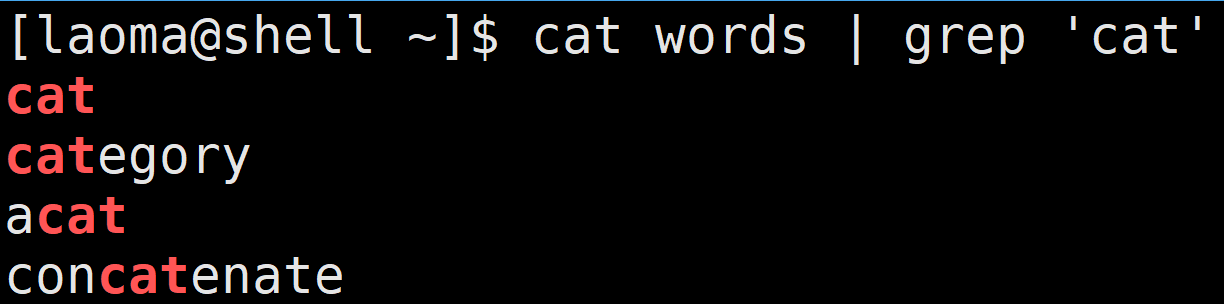
[laoma@shell ~]$ cat words | grep 'cat'
字符集
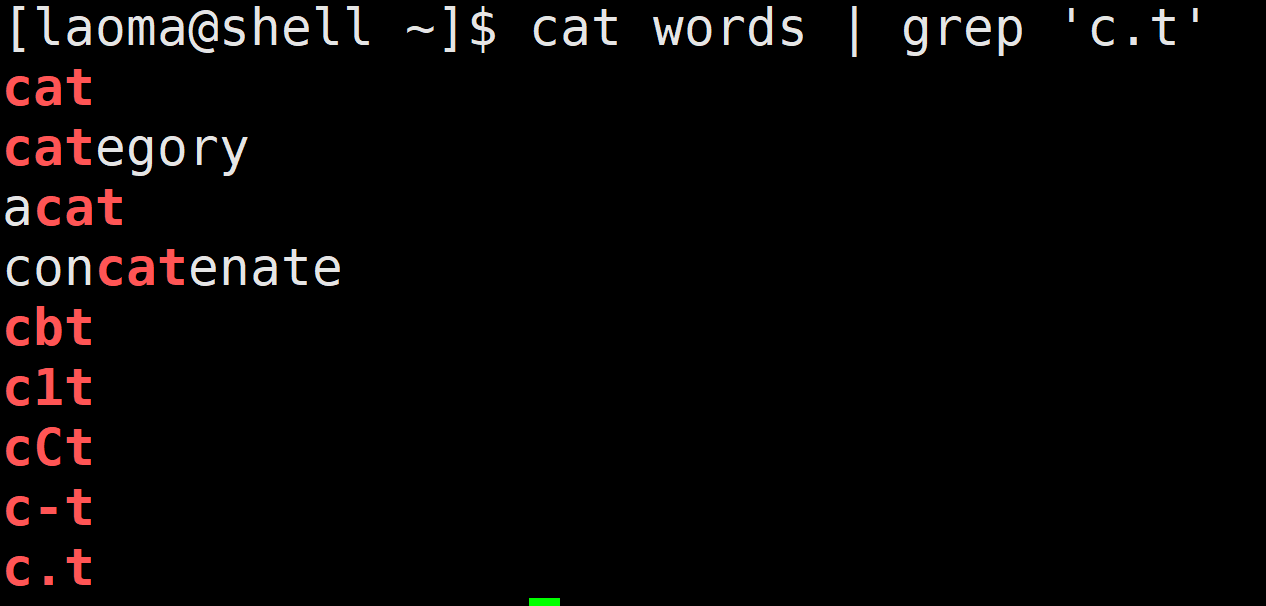
.
匹配除换行符(\n、\r)之外的任何单个字符,相等于[^\n\r]。
[laoma@shell ~]$ cat words | grep 'c.t'
[...]
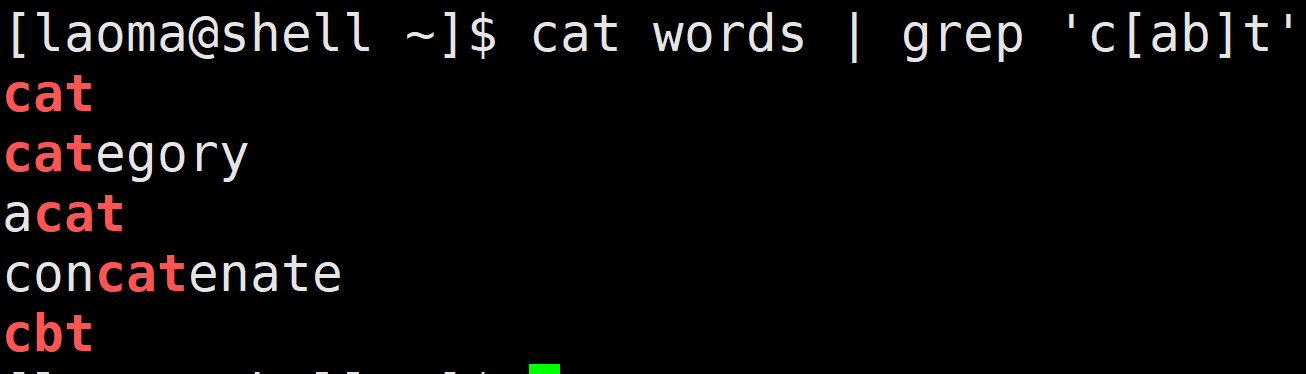
匹配 [...] 中的任意一个字符。
[laoma@shell ~]$ cat words | grep 'c[ab]t'
[a-z] [A-Z] [0-9]
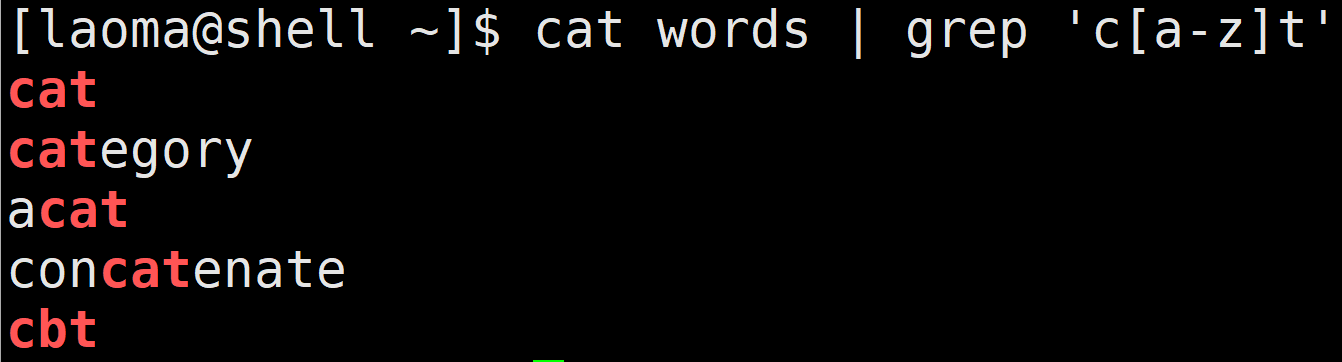
[a-z],匹配所有小写字母。[A-Z],匹配所有大写字母。[0-9],匹配所有数字。
[laoma@shell ~]$ cat words | grep 'c[a-z]t'
[laoma@shell ~]$ cat words | grep 'c[A-Z]t'

[laoma@shell ~]$ cat words | grep 'c[0-9]t'

[laoma@shell ~]$ cat words | grep 'c[a-z0-9]t'
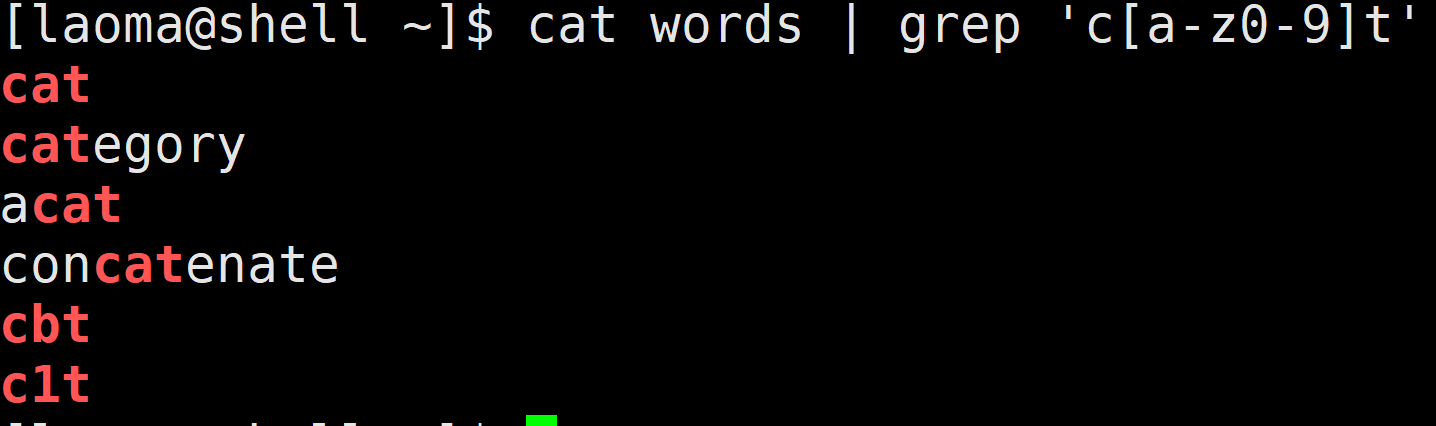
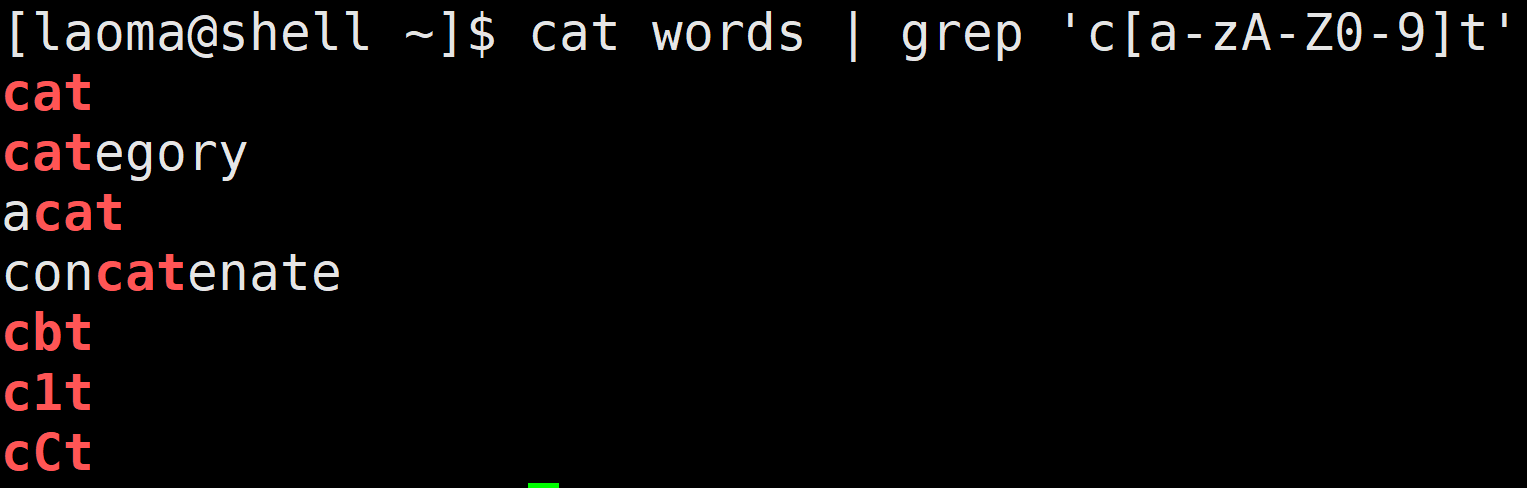
[laoma@shell ~]$ cat words | grep 'c[a-zA-Z0-9]t'
# 要想匹配-符号,将改符号写在第一个位置
[laoma@shell ~]$ cat words | grep 'c[-a-zA-Z0-9]t'

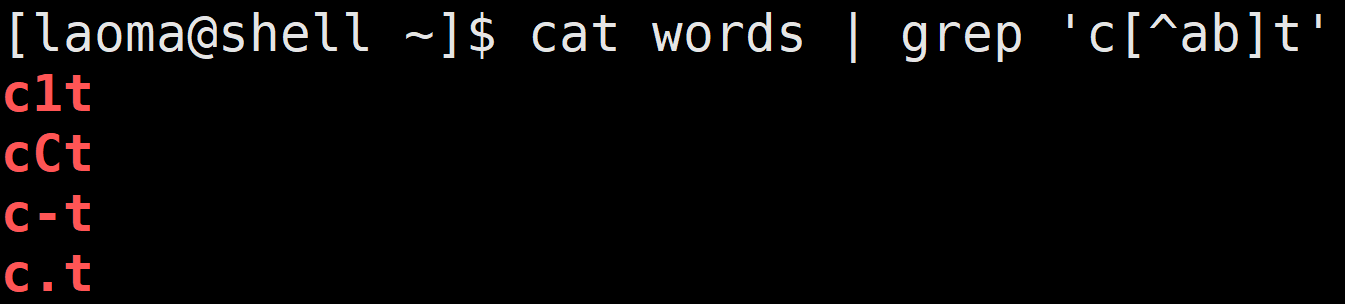
[^...]
匹配除了 [...] 中字符的所有字符。
[laoma@shell ~]$ cat words | grep 'c[^ab]t'
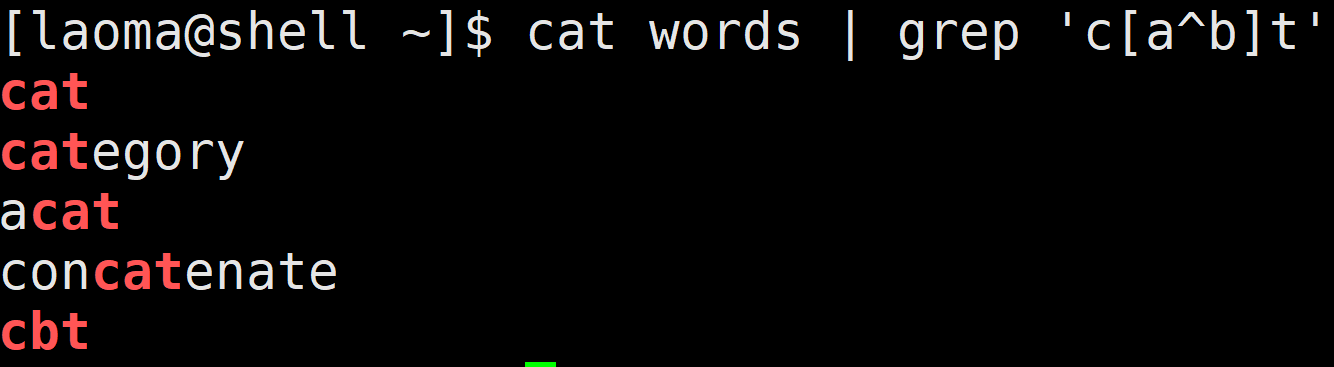
# ^放中间会被当做普通字符
[laoma@shell ~]$ cat words | grep 'c[a^b]t'
### \
将下一个字符标记为或特殊字符、或原义字符、或向后引用、或八进制转义符。
例如, 'n' 匹配字符 'n'。\n 匹配换行符。序列 \\ 匹配 \,而 \( 则匹配 (。
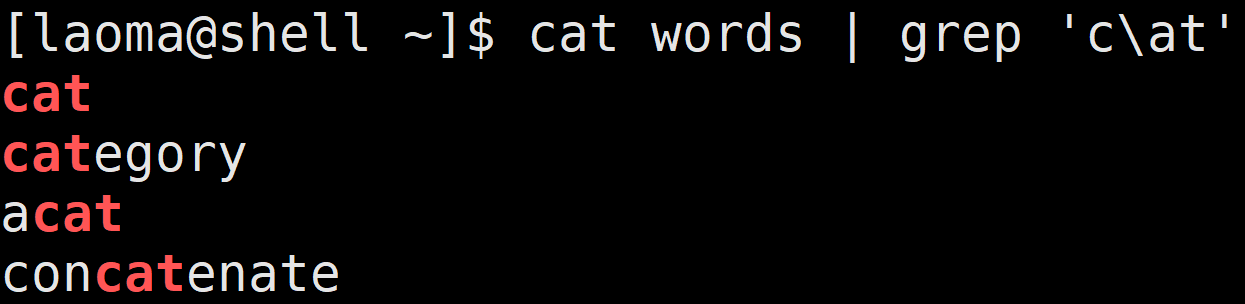
[laoma@shell ~]$ cat words | grep 'c\.t'

# 匹配普通字符,虽然可以匹配,但强烈建议不要在前面加\
[laoma@shell ~]$ cat words | grep 'c\at'
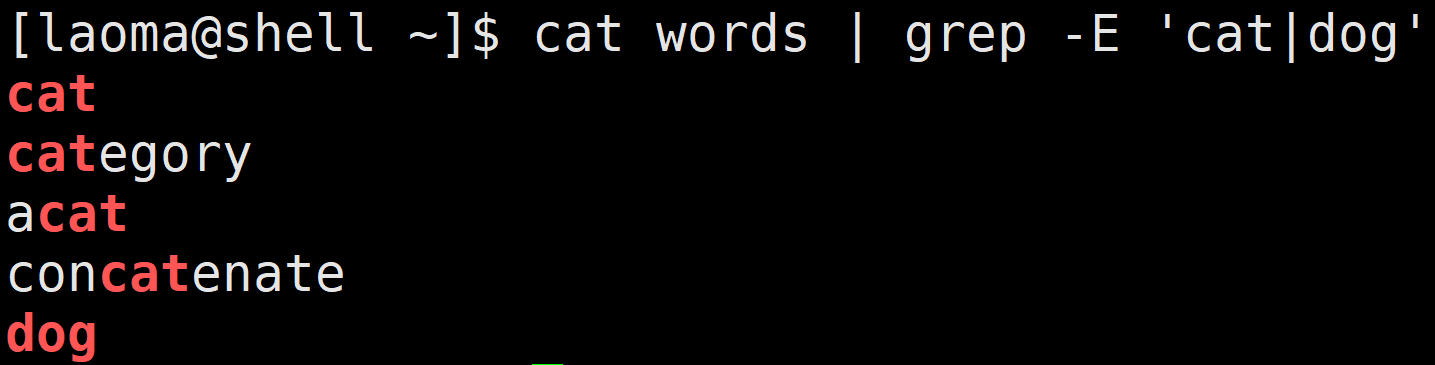
|
| 符号是扩展表达式中元字符,指明两项之间的一个选择。要匹配 |,请使用 \|。
# 使用egrep或者grep -E 匹配
[laoma@shell ~]$ cat words | egrep 'cat|dog'
# 或者
[laoma@shell ~]$ cat words | grep -E 'cat|dog'
字符集总结
| 选项 | 描述 |
|---|---|
| [[:digit:]] | 数字: 0 1 2 3 4 5 6 7 8 9 等同于[0-9] |
| [[:xdigit:]] | 十六进制数字: 0 1 2 3 4 5 6 7 8 9 A B C D E F a b c d e f 等同于[0-9a-fA-F] |
| [[:lower:]] | 小写字母:在 C 语言环境和ASCII字符编码中,对应于[a-z] |
| [[:upper:]] | 大写字母:在 C 语言环境和ASCII字符编码中,对应于[A-Z] |
| [[:alpha:]] | 字母字符:[[:lower:]和[[:upper:]];在C语言环境和ASCII字符编码中,等同于[A-Za-z] |
| [[:alnum:]] | 字母数字字符:[:alpha:]和[:digit:];在C语言环境和ASCII字符编码中,等同于[0-9A-Za-z] |
| [[:blank:]]或者[[:space:]] | 空白字符:在 C 语言环境中,它对应于制表符、换行符、垂直制表符、换页符、回车符和空格。 |
| [[:punct:]] | 标点符号:在C语言环境和ASCII字符编码中,它对应于!" # $ % &'()*+,-./:;<=>?@[]^_`{|}~ |
| [[:print:]]或者 [[:graph:]] | 可打印字符: [[:alnum:]]、[[:punct:]]。 |
| [[:cntrl:]] | 控制字符。在 ASCII中, 这些字符对应八进制代码000到037和 177 (DEL)。 |
非打印字符
终端中不显示的字符,例如换行符。
| 字符 | 描述 |
|---|---|
| \cx | 匹配由x指明的控制字符。例如, \cM 匹配一个 Control-M 或回车符。x 的值必须为 A-Z 或 a-z 之一。否则,将 c 视为一个原义的 'c' 字符。 |
| \f | 匹配一个换页符。等价于 \x0c 和 \cL。 |
| \n | 匹配一个换行符。等价于 \x0a 和 \cJ。 |
| \r | 匹配一个回车符。等价于 \x0d 和 \cM。 |
| \s | 匹配任何空白字符,包括空格、制表符、换页符等等。等价于 [ \f\n\r\t\v]。注意 Unicode 正则表达式会匹配全角空格符。 |
| \S | 匹配任何==非==空白字符。等价于 [^ \f\n\r\t\v]。 |
| \w | 匹配字母、数字、下划线。等价于 [A-Za-z0-9_] |
| \W | 匹配任何非单词字符。等价于[^A-Za-z0-9_] |
| \t | 匹配一个制表符。等价于 \x09 和 \cI。 |
| \v | 匹配一个垂直制表符。等价于 \x0b 和 \cK。 |
grep 命令支持
\w、\W、\s、\S。
定位符
^
匹配行首位置。
[laoma@shell ~]$ cat words | grep '^cat'

$
匹配行末位置。
[laoma@shell ~]$ cat words | grep 'cat$'

# 查看 /var/log/message Aug 19 14:01 到 Aug 19 14:06 时间段发生的事件
[laoma@shell ~]$ sudo cat /var/log/messages | egrep '^Aug 19 14:0[1-6]'

# 只包含cat的行
[laoma@shell ~]$ cat words | grep '^cat$'
cat

# 排除/etc/profile文件中以#开头的行
[laoma@shell ~]$ cat /etc/profile | egrep  '^[^#]'

# 查询/etc/profile文件中有效行
[laoma@shell ~]$ cat /etc/profile | egrep -v '^#|^$'
# -v 取反,不显示匹配的内容

# 查看系统中有哪些仓库
[laoma@shell ~]$ yum-config-manager | grep '^\[' | grep -v main
[base]
[epel]
[extras]
[updates]
\b
匹配一个单词边界。
[laoma@shell ~]$ echo hello cat kitty >> words
[laoma@shell ~]$ cat words | grep '\bcat'

[laoma@shell ~]$ cat words | grep 'cat\b'

[laoma@shell ~]$ cat words | grep '\bcat\b'

\B(基本不用)
非单词边界匹配。
[laoma@shell ~]$ cat words | grep '\Bcat\B'

\< 和 \>(基本不用)
\<,匹配一个单词左边界。\>,匹配一个单词右边界。
[laoma@shell ~]$ cat words | grep '\<cat'
cat
category
hello cat

[laoma@shell ~]$ cat words | grep 'cat\>'
cat
acat
hello cat
限定次数
*
匹配前面的子表达式任意次数。
[laoma@shell ~]$ echo dg >> words
[laoma@shell ~]$ echo doog >> words
[laoma@shell ~]$ cat words | grep 'do*g'
dog
dg
doog
+
+ 是扩展表达式元字符,匹配前面的子表达式一次以上次数。
[laoma@shell ~]$ cat words | egrep 'do+g'
dog
doog
?
? 是扩展表达式元字符,匹配前面的子表达式一次以下次数。
[laoma@shell ~]$ cat words | egrep 'do?g'
dog
dg
{n}
{} 是扩展表达式元字符,用于匹配特定次数。例如:{n},配置n次。
[laoma@shell ~]$ cat words | egrep 'do{2}g'
doog
{m,n}
{m,n},是扩展表达式元字符,用于匹配次数介于m-n之间。
[laoma@shell ~]$ echo dooog >> words
[laoma@shell ~]$ echo doooog >> words

[laoma@shell ~]$ cat words | egrep 'do{2,3}g'
doog
dooog
{m,}
{m,},是扩展表达式元字符,匹配前面的子表达式m次以上次数。
[laoma@shell ~]$ cat words | egrep 'do{2,}g'
doog
dooog
doooog
{,n}
{,n},是扩展表达式元字符,匹配前面的子表达式n次以下次数。
[laoma@shell ~]$ cat words | egrep 'do{,3}g'
dog
doog
dg
dooog
()
标记一个子表达式。
[laoma@shell ~]$ echo dogdog >> words
[laoma@shell ~]$ echo dogdogdog >> words
[laoma@shell ~]$ echo dogdogdogdog >> words

[laoma@shell ~]$ cat words | egrep '(dog){2,3}'
dogdog
dogdogdog
dogdogdogdog

[laoma@shell ~]$ cat words | egrep '(dog){2,}'
dogdog
dogdogdog
dogdogdogdog
综合案例
如何过滤出以下内容中所有有效IPv4地址?
0.0.0.0
1.1.1.1
11.11.11.111
111.111.111.111
999.9.9.9
01.1.1.1
10.0.0.0
0.1.1.1
266.1.1.1
248.1.1.1
256.1.1.1
参考答案
# 第一个位
[1-9][0-9]? # 1-99
1[0-9]{2}   # 100-199
2[0-4][0-9] # 200-249
25[0-5]     # 250-255

# 第二位
[1-9]?[0-9]  # 0-99
1[0-9]{2}    # 100-199
2[0-4][0-9]  # 200-249
25[0-5]      # 250-255

# 最终代码
\b(([1-9]?[0-9])|(1[0-9]{2})|(2[0-4][0-9])|(25[0-5]))(\.(([1-9]?[0-9])|(1[0-9]{2})|(2[0-4][0-9])|(25[0-5]))){3}\b
反向引用
对一个正则表达式模式或部分模式两边添加圆括号将导致相关匹配存储到一个临时缓冲区中,所捕获的每个子匹配都按照在正则表达式模式中从左到右出现的顺序存储。缓冲区编号从 1 开始,最多可存储 99 个捕获的子表达式。
每个缓冲区都可以使用 \N 访问,其中 N 为一个标识特定缓冲区的一位或两位十进制数。
\N 这用引用方式称之为反向引用。
[laoma@shell ~]$ echo 'laoma laoniu laohu laoma laoniu laohu' | \
> egrep -o '(laoma) (laoniu).*\1'

# 过滤结果如下
laoma laoniu laohu laoma

[laoma@shell ~]$ echo 'Is is the cost of of gasoline going up up?' | \
> egrep -o '\b([a-z]+) \1\b'
# 过滤结果如下
of of
up up

[laoma@shell ~]$ echo 'Is is the cost of of of gasoline going up up?' | egrep -o '(\b[a-z]+\b\s+)\1{1,}'
# 过滤结果如下
of of of

[laoma@shell ~]$ echo 'Is is the cost of  of of gasoline going up up?' | egrep -o '(\b[a-z]+\b\s+)\1{1,}'
# 过滤结果如下
of of
其他工具使用案例
vim
搜索和替换。
less
搜索。
三剑客
- grep:过滤
- sed:修改
- awk:格式化输出
grep
grep 介绍
grep 是 Linux 系统中最重要的命令之一,其功能是从文本文件或管道数据流中筛选匹配的行及数据
grep 命令语法
- 过滤管道:
command | grep [OPTION]... PATTERNS - 过滤文件:
grep [OPTION]... PATTERNS [FILE]...
grep 命令帮助信息如下:
[laoma@shell bin]$ grep --help
Usage: grep [OPTION]... PATTERNS [FILE]...
Search for PATTERNS in each FILE.
Example: grep -i 'hello world' menu.h main.c
PATTERNS can contain multiple patterns separated by newlines.

Pattern selection and interpretation:
  -E, --extended-regexp     PATTERNS are extended regular expressions
  -F, --fixed-strings       PATTERNS are strings
  -G, --basic-regexp        PATTERNS are basic regular expressions
  -P, --perl-regexp         PATTERNS are Perl regular expressions
  -e, --regexp=PATTERNS     use PATTERNS for matching
  -f, --file=FILE           take PATTERNS from FILE
  -i, --ignore-case         ignore case distinctions in patterns and data
      --no-ignore-case      do not ignore case distinctions (default)
  -w, --word-regexp         match only whole words
  -x, --line-regexp         match only whole lines
  -z, --null-data           a data line ends in 0 byte, not newline

Miscellaneous:
  -s, --no-messages         suppress error messages
  -v, --invert-match        select non-matching lines
  -V, --version             display version information and exit
      --help                display this help text and exit

Output control:
  -m, --max-count=NUM       stop after NUM selected lines
  -b, --byte-offset         print the byte offset with output lines
  -n, --line-number         print line number with output lines
      --line-buffered       flush output on every line
  -H, --with-filename       print file name with output lines
  -h, --no-filename         suppress the file name prefix on output
      --label=LABEL         use LABEL as the standard input file name prefix
  -o, --only-matching       show only nonempty parts of lines that match
  -q, --quiet, --silent     suppress all normal output
      --binary-files=TYPE   assume that binary files are TYPE;
                            TYPE is 'binary', 'text', or 'without-match'
  -a, --text                equivalent to --binary-files=text
  -I                        equivalent to --binary-files=without-match
  -d, --directories=ACTION  how to handle directories;
                            ACTION is 'read', 'recurse', or 'skip'
  -D, --devices=ACTION      how to handle devices, FIFOs and sockets;
                            ACTION is 'read' or 'skip'
  -r, --recursive           like --directories=recurse
  -R, --dereference-recursive
                            likewise, but follow all symlinks
      --include=GLOB        search only files that match GLOB (a file pattern)
      --exclude=GLOB        skip files that match GLOB
      --exclude-from=FILE   skip files that match any file pattern from FILE
      --exclude-dir=GLOB    skip directories that match GLOB
  -L, --files-without-match print only names of FILEs with no selected lines
  -l, --files-with-matches  print only names of FILEs with selected lines
  -c, --count               print only a count of selected lines per FILE
  -T, --initial-tab         make tabs line up (if needed)
  -Z, --null                print 0 byte after FILE name

Context control:
  -B, --before-context=NUM  print NUM lines of leading context
  -A, --after-context=NUM   print NUM lines of trailing context
  -C, --context=NUM         print NUM lines of output context
  -NUM                      same as --context=NUM
      --group-separator=SEP use SEP as a group separator
      --no-group-separator  use empty string as a group separator
      --color[=WHEN],
      --colour[=WHEN]       use markers to highlight the matching strings;
                            WHEN is 'always', 'never', or 'auto'
  -U, --binary              do not strip CR characters at EOL (MSDOS/Windows)

When FILE is '-', read standard input.  With no FILE, read '.' if
recursive, '-' otherwise.  With fewer than two FILEs, assume -h.
Exit status is 0 if any line is selected, 1 otherwise;
if any error occurs and -q is not given, the exit status is 2.

Report bugs to: bug-grep@gnu.org
GNU grep home page: <http://www.gnu.org/software/grep/>
General help using GNU software: <https://www.gnu.org/gethelp/>
文件准备
[laoma@shell ~]$ vim words
cat
category
acat
concatenate
cbt
c1t
cCt
c-t
c.t
dog
模式选择和解释选项
-E 选项
支持扩展正则表达式,相当于 egrep 命令。
[laoma@shell ~]$ cat words | grep -E '(dog){3}'
# 或者
[laoma@shell ~]$ cat words | egrep '(dog){3}'
dogdogdog
dogdogdogdog
-e 选项
使用多个 -e 选项匹配多个PATTERNS。
[laoma@shell ~]$ cat words | grep -e 'cat' -e 'dog'
# 或者
[laoma@shell ~]$ cat words | egrep 'cat|dog'
cat
category
acat
concatenate
dog
dogdog
dogdogdog
dogdogdogdog
hello cat
-f 选项
从文件读取多个 PATTERNS。
[laoma@shell ~]$ echo -e 'cat\ndog' > pattens_file
[laoma@shell ~]$ cat pattens_file
cat
dog
[laoma@shell ~]$ cat words | grep -f pattens_file
cat
category
acat
concatenate
dog
dogdog
dogdogdog
dogdogdogdog
hello cat
-i 选项
忽略大小写匹配。
[laoma@shell ~]$ cat words | grep -i 'cBt'
cbt
-w 选项
匹配整个单词。
[laoma@shell ~]$ cat words | grep -w 'cat'
# 或者
[laoma@shell ~]$ cat words | grep '\bcat\b'
cat
hello cat
-x 选项
匹配整行。
[laoma@shell ~]$ cat words | grep -x 'cat'
# 或者
[laoma@shell ~]$ cat words | grep '^cat$'
cat
输出控制选项
-v 选项
反向匹配,显示与PATTERNS不匹配的项目。
[laoma@shell ~]$ cat words | egrep -v '^d|^c'
acat
hello cat

# 不看注释行和空白行
[laoma@shell ~]$ egrep -v '^\s*(#|$)' /etc/profile
-m 选项
控制最大匹配数目,匹配特定次数后停止匹配。
[laoma@shell ~]$ cat words | grep 'dog'
dog
dogdog
dogdogdog
dogdogdogdog

[laoma@shell ~]$ cat words | grep -m2 'dog'
dog
dogdog
-c 选项
显示匹配到项目的数量。
[laoma@shell ~]$ cat words | grep -c 'dog'
4
-b 选项
显示匹配项目的字节偏移量。
[laoma@shell ~]$ head -5 words
cat
category
acat
concatenate
dog

[laoma@shell ~]$ cat words | grep -b 'cat'
0:cat
4:category
13:acat
18:concatenate
109:hello cat
-n 选项
显示匹配项目的行号。
[laoma@shell ~]$ cat words | grep -n 'cat'
1:cat
2:category
3:acat
4:concatenate
19:hello cat
-o 选项
只显示匹配到的内容,行中其他内容不显示。
[laoma@shell ~]$ cat words | egrep '(dog){3}'
dogdogdog
dogdogdogdog

[laoma@shell ~]$ cat words | egrep -o '(dog){3}'
dogdogdog
dogdogdog
-q 选项
不显示任何正常输出。一般用于脚本判定文件中是否包含特定内容。
通过特殊变量 $? 查看是否匹配到内容。
# 找到的情况
[laoma@shell ~]$ cat words | egrep -q '(dog){3}'
[laoma@shell ~]$ echo $?
0

# 找不到的情况
[laoma@shell ~]$ cat words | egrep -q '(dog){3}asdfasfdasf'
[laoma@shell ~]$ echo $?
1
-s 选项
不显示任何错误输出。
[laoma@shell ~]$ grep '^SELINUX=' /etc/shadow /etc/selinux/config
grep: /etc/shadow: Permission denied
/etc/selinux/config:SELINUX=disabled

[laoma@shell ~]$ grep -s '^SELINUX=' /etc/shadow /etc/selinux/config
/etc/selinux/config:SELINUX=disabled
查找文件选项
-r -R 选项(超级重要)
-r,递归匹配目录。-R,递归匹配目录,跟随软链接。
[laoma@shell ~]$ grep -r '^SELINUX=' -s /etc
/etc/selinux/config:SELINUX=disabled
补充:centos系统查找文件工具find和locate(由mlocate包提供)
[root@shell ~ 15:39:25]# find /etc -name 'pass*'
/etc/passwd-
/etc/passwd
/etc/openldap/certs/password
/etc/selinux/targeted/active/modules/100/passenger
/etc/pam.d/passwd
/etc/pam.d/password-auth-ac
/etc/pam.d/password-auth

# 先更新locate数据,然后再查找
[root@shell ~ 15:40:41]# updatedb
[root@shell ~ 15:40:52]# locate pass |grep ^/etc
/etc/passwd
/etc/passwd-
/etc/openldap/certs/password
/etc/pam.d/passwd
/etc/pam.d/password-auth
/etc/pam.d/password-auth-ac
...
-h 和 -H 选项
-h,不显示匹配项目所在文件的文件名。-H,显示匹配项目所在文件的文件名,默认情况使用该选项。
[laoma@shell ~]$ grep -r '^SELINUX=' -s -h /etc
SELINUX=disabled

[laoma@shell ~]$ grep -r '^SELINUX=' -s -H /etc
/etc/selinux/config:SELINUX=disabled
-l 和 -L 选项
-l,对目录匹配时,只显示那些 包含匹配模式的文件的名称。-L,对目录匹配时,只显示那些 ==不== 包含匹配模式的文件的名称。
[laoma@shell ~]$ grep -r '^SELINUX=' -s -l /etc
/etc/selinux/config

[laoma@shell ~]$ grep -r '^SELINUX=' -s -L /etc | tail -5
/etc/gdm/PostLogin/Default.sample
/etc/gdm/PostSession/Default
/etc/gdm/PreSession/Default
/etc/gdm/custom.conf
/etc/nfs.conf
输出内容控制选项
-B 选项
显示匹配项目本身,以及前多少行。
[laoma@shell ~]$ ip addr | grep '10.1.8.88' -B2
2: ens32: <BROADCAST,MULTICAST,UP,LOWER_UP> mtu 1500 qdisc pfifo_fast state UP group default qlen 1000
    link/ether 00:0c:29:2b:c8:7a brd ff:ff:ff:ff:ff:ff
    inet 10.1.8.88/24 brd 10.1.8.255 scope global noprefixroute ens32
-A 选项
显示匹配项目本身,以及后多少行。
[laoma@shell ~]$ ip addr |grep 'ens32:' -A2
2: ens32: <BROADCAST,MULTICAST,UP,LOWER_UP> mtu 1500 qdisc pfifo_fast state UP group default qlen 1000
    link/ether 00:0c:29:2b:c8:7a brd ff:ff:ff:ff:ff:ff
    inet 10.1.8.88/24 brd 10.1.8.255 scope global noprefixroute ens32
-C 选项
显示匹配项目本身,以及前后多少行。
[laoma@shell ~]$ ip addr |grep '10.1.8.88' -C2
2: ens32: <BROADCAST,MULTICAST,UP,LOWER_UP> mtu 1500 qdisc pfifo_fast state UP group default qlen 1000
    link/ether 00:0c:29:2b:c8:7a brd ff:ff:ff:ff:ff:ff
    inet 10.1.8.88/24 brd 10.1.8.255 scope global noprefixroute ens32
       valid_lft forever preferred_lft forever
    inet6 fe80::5882:62aa:161b:c9c1/64 scope link tentative noprefixroute dadfailed
sed
sed 介绍
sed,英文全称 stream editor ,是一种非交互式的流编辑器,能够实现对文本非交互式的处理,功能很强大。
sed 是一个 70 后,诞生于 1973 - 1974 年间,具体时间未知。而出生地则是鼎鼎大名的 贝尔实验室。
sed 是 麦克马洪 ( McMahon ) 老爷子在 贝尔实验室 时开发出来的。
sed 的诞生使并不是那么的神秘,它的诞生只不过是 麦克马洪 ( McMahon ) 老爷子想写一个 行编辑器,谁知写着写着就写成了 sed 的样子。
其实,在 sed 之前还有一个更古老的行编辑器,名字叫做 ed 编辑器。大概是 麦克马洪 ( McMahon ) 老爷子觉得 ed 编辑器不好用吧,顺手重新构架和编写。
sed 工作流程
读取行 -> 执行 -> 显示 -> 读取行 -> 执行 -> 显示 -> .... -> 读取行 -> 执行 -> 显示
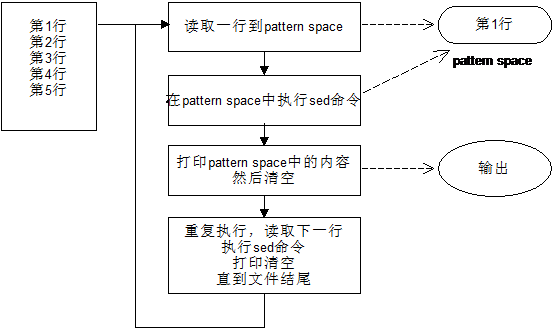
- 读取行
sed 从输入流 (文件、管道、标准输入流)中读取 一行 并存储在名叫 pattern space 的内部空间中。
sed 是行文字处理器。每次只会读取一行。
sed 内部会有一个计数器,记录着当前已经处理多少行,也就是当前行的行号。
- 执行
按照 sed 命令定义的顺序依次应用于刚刚读取的 一行 数据。
默认情况下,sed 一行一行的处理所有的输入数据。但如果我们指定了行号,则只会处理指定的行。
- 显示
把经过 sed 命令处理的数据发送到输出流(文件、管道、标准输出),并同时清空 pattern space 空间。
- 上面流程一直循环,直到输入流中的数据全部处理完成。
sed 注意事项
整个流程看似简单,有几个知识点需要注意:
-
pattern space空间是 sed 在内存中开辟的一个私有的存储区域。内存的特性,会导致关闭命令行或关机数据就没了。 -
默认情况下,sed 命令只会处理
pattern space空间中的数据,且并不会将处理后的数据保存到源文件中。也就是说,sed 默认并不会修改源文件。
但 GNU SED 提供提供了一种方式用于修改 源文件。方式就是传递 -i 选项,在后面的章节中介绍。
- sed 还在内存上开辟了另一个私有的空间
hold space用于保存处理后的数据以供以后检索。
每一个周期执行结束,sed 会清空 pattern space 空间的内容,但 hold space 空间的内容并不会清空。hold space 空间用于存储处理后数据,sed 命令并不会对这里的数据处理。
这样,当 sed 需要之前处理后的数据时,可以随时从 hold space 空间读取。
-
sed 程序执行前,模式
pattern和hold space空间都是空的。 -
如果我们没有传递任何输入文件,sed 默认会从 标准输入 中读取数据。
-
sed 可以指定只处理输入数据中的行范围。默认情况下是全部行,因此会依次处理每一行。
sed 命令语法
sed 帮助
[laoma@shell ~]$ sed --help
Usage: sed [OPTION]... {script-only-if-no-other-script} [input-file]...

  -n, --quiet, --silent
                 suppress automatic printing of pattern space
  -e script, --expression=script
                 add the script to the commands to be executed
  -f script-file, --file=script-file
                 add the contents of script-file to the commands to be executed
  --follow-symlinks
                 follow symlinks when processing in place
  -i[SUFFIX], --in-place[=SUFFIX]
                 edit files in place (makes backup if SUFFIX supplied)
  -c, --copy
                 use copy instead of rename when shuffling files in -i mode
  -b, --binary
                 does nothing; for compatibility with WIN32/CYGWIN/MSDOS/EMX (
                 open files in binary mode (CR+LFs are not treated specially))
  -l N, --line-length=N
                 specify the desired line-wrap length for the `l' command
  --posix
                 disable all GNU extensions.
  -r, --regexp-extended
                 use extended regular expressions in the script.
  -s, --separate
                 consider files as separate rather than as a single continuous
                 long stream.
  -u, --unspaceed
                 load minimal amounts of data from the input files and flush
                 the output spaces more often
  -z, --null-data
                 separate lines by NUL characters
  --help
                 display this help and exit
  --version
                 output version information and exit

If no -e, --expression, -f, or --file option is given, then the first
non-option argument is taken as the sed script to interpret.  All
remaining arguments are names of input files; if no input files are
specified, then the standard input is read.

GNU sed home page: <http://www.gnu.org/software/sed/>.
General help using GNU software: <http://www.gnu.org/gethelp/>.
E-mail bug reports to: <bug-sed@gnu.org>.
Be sure to include the word ``sed'' somewhere in the ``Subject:'' field.
 -n, --quiet, --silent    取消自动打印模式空间
 -e 脚本, --expression=脚本   添加“脚本”到程序的运行列表
 -f 脚本文件, --file=脚本文件  添加“脚本文件”到程序的运行列表
 --follow-symlinks    直接修改文件时跟随软链接
 -i[扩展名], --in-place[=扩展名]    直接修改文件(如果指定扩展名就备份文件)
 -l N, --line-length=N   指定“l”命令的换行期望长度
 --posix  关闭所有 GNU 扩展
 -r, --regexp-extended  在脚本中使用扩展正则表达式
 -s, --separate  将输入文件视为各个独立的文件而不是一个长的连续输入
 -u, --unspaceed  从输入文件读取最少的数据,更频繁的刷新输出
 --help     打印帮助并退出
 --version  输出版本信息并退出
 -a ∶新增, a 的后面可以接字串,而这些字串会在新的一行出现(目前的下一行)~
 -c ∶取代, c 的后面可以接字串,这些字串可以取代 n1,n2 之间的行!
 -d ∶删除,因为是删除啊,所以 d 后面通常不接任何咚咚;
 -i ∶插入, i 的后面可以接字串,而这些字串会在新的一行出现(目前的上一行);
 -p ∶列印,亦即将某个选择的资料印出。通常 p 会与参数 sed -n 一起运作~
 -s ∶取代,可以直接进行取代的工作哩!通常这个 s 的动作可以搭配正规表示法
sed 命令语法简写格式如下:
sed [option] [sed-command] [input-file]
总的来说 sed 命令主要由四部分构成:
sed命令。[option]命令行选项,用于改变 sed 的工作流程。[sed-command]是具体的 sed 命令。[input-file]输入数据,如果不指定,则默认从标准输入中读取。
示例1:模拟cat命令打印文件内容
[laoma@shell ~]$ cat > data.txt <<'EOF'
I am studing sed
I am www.laoma.cloud
I am a Superman
I am so handsome
EOF

[laoma@shell ~]$ sed '' data.txt
I am studing sed
I am www.laoma.cloud
I am a Superman
I am so handsome
对照着 sed 命令的语法格式:
- 这里未使用
option。 '',对应着[sed-command]为具体的 sed 语句。data.txt,对应着[input-file],用于提供输入数据。
示例2:从标准输入中读取数据
如果我们没有提供输入文件,那么 sed 默认会冲标准输入中读取数据。
[laoma@shell ~]$ sed ''
## 输入hello world,并回车
hello world
## 输出hello world
hello world
## 按ctrl+d推出
-e 选项
从命令行读取sed命令,我们需要将 sed 命令使用单引号 ( '' ) 引起来。
## 打印data.txt文件内容
[laoma@shell ~]$ sed -e '' data.txt

## 如果只有一个命令,-e选项可以省略
[laoma@shell ~]$ sed '' data.txt

## -e 选项可以多次使用,1d是作用是删除第一行
[laoma@shell ~]$ sed -e '1d' -e '2d' -e '5d' data.txt
I am a Superman
I am so handsome
## 因为不存在第五行,所以也就没删除的效果

## 使用分号(;)分开多个命令
[laoma@shell ~]$ sed -e '1d;2d;5d' data.txt
I am a Superman
I am so handsome
-f 选项
sed 还支持把所有 sed 命令保存在一个普通的文本文件里,然后通过 -f 选项来运行这个文件。
当把 sed 存储在文件中时,需要注意 每一个 sed 命令独自成一行。
文件的作用仅仅用于存储命令而已,因此存储 sed 命令的文件并没有任何特殊,可以是一个 .txt 文本文件。
[laoma@shell ~]$ echo -e "1d\n2d\n5d" > scripts
[laoma@shell ~]$ cat scripts
1d
2d
5d
[laoma@shell ~]$ sed -f scripts data.txt
I am a Superman
I am so handsome
-n 选项(重要)
如果指定了该选项,那么模式空间数据将不会自动打印,需要明确指明打印才会输出记录。
## 以下命令没有任何输出
[laoma@shell ~]$ sed -n '' data.txt

## 打印第一行记录
[laoma@shell ~]$ sed -n '1p' data.txt
I am studing sed
sed 行寻址
作用
通过行寻址匹配要处理的输入流。
语法
这里以打印命令p为例。
语法:[address1[,address2]]p
address1和address2分别是 起始地址 和 结束地址,可以是 行号或 模式字符串。address1和address2都是可选参数,可以都不填,这时候就是打印所有行,从文件的开头到文件结束。- 如果存在一个,那么就是打印 单行。也就是只打印
address1指定的那行。 p命令仅从 模式缓冲区 中打印行,也就是该行不会发送到输出流,原始文件保持不变。
示例文件
[laoma@shell ~]$ echo 'This is 1
This is 2
This is 3
This is 4
This is 5 ' > test
演示
示例1: 打印所有行
## 打印所有行
[laoma@shell ~]$ cat test | sed ''
## 输出结果
This is 1
This is 2
This is 3
This is 4
This is 5

## sed 默认打印模式缓冲区中所有内容。

## 等效于
[laoma@shell ~]$ cat test | sed -n 'p'
## -n 关闭sed打印模式缓冲区中所有内容。
## p命令,明确打印输出模式缓冲区中所有内容。
示例2: 打印特定行
## 打印第1行
[laoma@shell ~]$ cat test | sed -n '1p'

## 输出结果
This is 1

## 打印第最后一行
[laoma@shell ~]$ cat test | sed -n '$p'
## 输出结果
This is 5
示例3: 打印第1行到3行
[laoma@shell ~]$ cat test | sed -n '1,3p'

## 输出结果
This is 1
This is 2
This is 3
示例4: 打印第3行到最后一行
[laoma@shell ~]$ cat test | sed -n '3,$p'

## 输出结果
This is 3
This is 4
This is 5
示例5: 连续输出,打印第2行以及后续两行
[laoma@shell ~]$ cat test | sed -n '2,+2p'

## 输出结果
This is 2
This is 3
This is 4
示例6: 隔行输出,打印第1行以及后续隔2行输出
[laoma@shell ~]$ cat test | sed -n '1~2p'

## 输出结果
This is 1
This is 3
This is 5
sed 模式寻址
sed 除了可以从行号来选择行,s还支持模式查找指定的行。
-
模式 可以是一个普通的字符串或者一个正则表达式。
-
模式 的语法和行寻址的语法类似,只是把行号换成了 模式 匹配。
例如,输出匹配指定模式的行,语法格式如下:
/pattern/
示例文件
[laoma@shell ~]$ cat << 'EOF' > ~/test
root:x:0:0:root:/root:/bin/bash
bin:x:1:1:bin:/bin:/bin/false
daemon:x:2:2:daemon:/sbin:/bin/false
mail:x:8:12:mail:/var/spool/mail:/bin/false
ftp:x:14:11:ftp:/home/ftp:/bin/false
&nobody:$:99:99:nobody:/:/bin/false
zhangy:x:1000:100:,,,:/home/zhangy:/bin/bash
http:x:33:33::/srv/http:/bin/false
dbus:x:81:81:System message bus:/:/bin/false
hal:x:82:82:HAL daemon:/:/bin/false
mysql:x:89:89::/var/lib/mysql:/bin/false
aaa:x:1001:1001::/home/aaa:/bin/bash
ba:x:1002:1002::/home/zhangy:/bin/bash
test:x:1003:1003::/home/test:/bin/bash
@zhangying:*:1004:1004::/home/test:/bin/bash
policykit:x:102:1005:Po
EOF
演示
示例1: 打印含有字符串zhang的行
[laoma@shell ~]$ cat test | sed -n '/zhang/p'
zhangy:x:1000:100:,,,:/home/zhangy:/bin/bash
ba:x:1002:1002::/home/zhangy:/bin/bash
@zhangying:*:1004:1004::/home/test:/bin/bash
示例2: 打印root开头的行到zhang开头的行
[laoma@shell ~]$ cat test | sed -n '/^root/,/^mail/p'
root:x:0:0:root:/root:/bin/bash
bin:x:1:1:bin:/bin:/bin/false
daemon:x:2:2:daemon:/sbin:/bin/false
mail:x:8:12:mail:/var/spool/mail:/bin/false
示例3: 打印root开头的行到第三行
[laoma@shell ~]$ cat test | sed -n '/^root/,3p'
root:x:0:0:root:/root:/bin/bash
bin:x:1:1:bin:/bin:/bin/false
daemon:x:2:2:daemon:/sbin:/bin/false
示例4: 打印root开头的行到最后一行
[laoma@shell ~]$ cat test | sed -n '/^root/,$p'
sed 子命令
打印
作用
- p,打印模式空间所有记录。
- P,打印模式空间第一行记录。
语法
格式:[address1[,address2]]p
address1和address2分别是 起始地址 和 结束地址,可以是 行号或 模式字符串。address1和address2都是可选参数,可以都不填,这时候就是打印所有行,从文件的开头到文件结束。- 如果存在一个,那么就是打印 单行。也就是只打印
address1指定的那行。 p命令仅从 模式缓冲区 中打印行,也就是该行不会发送到输出流,原始文件保持不变。
示例
[laoma@shell ~]$ echo 'This is 1
This is 2
This is 3' | sed -n '1{N;p}'

## 输出结果
This is 1
This is 2

[laoma@shell ~]$ echo 'This is 1
This is 2
This is 3' | sed -n '1{N;P}'

## 输出结果
This is 1
读取下一行
- n,提前读取下一行,覆盖模型空间之前读取的行。模型空间之前读取的行并没有删除,依然打印至标准输出,除非使用-n选项指明不打印。
示例1:打印偶数行内容
[laoma@shell ~]$ echo 'This is 1
This is 2
This is 3
This is 4
This is 5' | sed -n 'n;p'

## 输出内容
This is 2
This is 4
说明:
- 读取
This is 1,执行n命令,此时模式空间为This is 2,执行p,打印模式空间内容This is 2。 - 之后读取
This is 3,执行 n 命令,此时模式空间为This is 4,执行p,打印模式空间内容This is 4。 - 之后读取
This is 5,执行 n 命令,因为后续没有内容了,所以退出,并放弃p命令。
因此,最终打印出来的就是偶数行。
- N,简单来说就是追加下一行到模式空间,同时将两行看做一行,但是两行之间依然含有\n换行符。
示例1: 成对合并行
[laoma@shell ~]$ cat test | sed 'N;s/\n/==/'
root:x:0:0:root:/root:/bin/bash==bin:x:1:1:bin:/bin:/bin/false
daemon:x:2:2:daemon:/sbin:/bin/false==mail:x:8:12:mail:/var/spool/mail:/bin/false
...
说明:
N,追加下一行到当前行后面,组成一个新行来处理。s/\n/==/,将新行中\n换行符替换成==,末尾的换行符不替换。
示例2: 打印前2行
[laoma@shell ~]$ echo 'This is 1
This is 2
This is 3
This is 4
This is 5' | sed -n '1{N;p}'
This is 1
This is 2
替换(必须)
示例1:把test文件中的root替换成tankzhang,只不过只替换一次即终止在这一行的操作,并转到下一行
[laoma@shell ~]$ sed 's/root/tankzhang/' test | grep tankzhang
tankzhang:x:0:0:root:/root:/bin/bash
关闭 SELinux
[laoma@shell ~]$ sed -i 's/^SELINUX=.*/SELINUX=disabled/g' config
示例2:把test文件中的root全部替换成tankzhang。字母g是global的缩写。
[laoma@shell ~]$ sed 's/root/tankzhang/g' test |grep tankzhang
tankzhang:x:0:0:tankzhang:/tankzhang:/bin/bash
示例3:加了-n和p后表示只打印那些发生替换的行(部分替换),下面的例子,不需要使用grep命令。
[laoma@shell ~]$ sed -n 's/root/tankzhang/p' test
tankzhang:x:0:0:root:/root:/bin/bash
示例4:加了-n和pg后表示只打印那些发生替换的行(全部替换)
[laoma@shell ~]$ sed -n 's/root/tankzhang/gp' test
tankzhang:x:0:0:tankzhang:/tankzhang:/bin/bash
示例5:在第二行到第八行之间,替换以zhang开头的行,用ying来替换,并显示替换的行
[laoma@shell ~]$ sed -ne '2,8s/^zhang/ying/gp' test
yingy:x:1000:100:,,,:/home/zhangy:/bin/bash
示例6: 从以zhang开头的行开始,到匹配Po的行结束,在他们之间进行替换
[laoma@shell ~]$ sed -ne '/^zhang/,/Po/ s/zhang/ying/gp' test
yingy:x:1000:100:,,,:/home/yingy:/bin/bash
ba:x:1002:1002::/home/yingy:/bin/bash
@yingying:*:1004:1004::/home/test:/bin/bash
替换中的分隔符可以自定义,默认是/。
示例7: 自定义替换分隔符为 #。
[laoma@shell ~]$ sed -n 's#root#hello#gp' test
hello:x:0:0:hello:/hello:/bin/bash
其他替换
[laoma@shell ~]$ cat test1.txt
my my my my my
my my my my my
my my my my my

#替换每行第3个my
[laoma@shell ~]$ sed "s/my/your/3" test1.txt
my my your my my
my my your my my
my my your my my

#只替换第3行的第1个my
[laoma@shell ~]$ sed "3s/my/your/1" test1.txt
my my my my my
my my my my my
your my my my my

#只替换每行的第3个及以后的my
[laoma@shell ~]$ sed 's/my/your/3g' test1.txt
my my your your your
my my your your your
my my your your your

## 思考:
## 1. 第1个到第3个匹配对象?
[laoma@shell ~]$ sed 's/my/your/;s/my/your/;s/my/your/' test1.txt

## 2. 第2个到第4个匹配对象?
[laoma@shell ~]$ sed 's/my/your/2;s/my/your/2;s/my/your/2' test1.txt
分隔符 ; 和 -e 选项
需要执行多个sed处理命令时,用分号分开,或者使用 -e 选项。
示例:
- 在第2行到第8行之间,替换以zhang开头的行,用ying来替换
- 在第5行到第10行之间,用goodbay来替换dbus,并显示替换的行
[laoma@shell ~]$ cat test | sed -n '2,8s/^zhang/ying/gp;5,10s#dbus#goodbay#gp'
yingy:x:1000:100:,,,:/home/zhangy:/bin/bash
goodbay:x:81:81:System message bus:/:/bin/false

[laoma@shell ~]$ cat test | sed -ne '2,8s/zhang/ying/gp' -ne '5,10s#dbus#goodbay#gp'
yingy:x:1000:100:,,,:/home/yingy:/bin/bash
goodbay:x:81:81:System message bus:/:/bin/false
插入(重要)
a(append) 在匹配行下面插入新行
[laoma@shell ~]$ sed '/root/a====aaaa====' test
root:x:0:0:root:/root:/bin/bash
====aaaa====
bin:x:1:1:bin:/bin:/bin/false
......
i(insert) 在匹配行上面插入新行
[laoma@shell ~]$ sed '/root/i====iiii====' test
====iiii====
root:x:0:0:root:/root:/bin/bash
......
思考:是否可以使用 s 命令实现插入
- 在匹配行下面插入新行
bash
   [laoma@shell ~]$ sed -nr 's/^root(.*)/root\1\n====aaaa====/p' test
   root:x:0:0:root:/root:/bin/bash
   ====aaaa====
- 在匹配行上面插入新行
bash
   [laoma@shell ~]$ sed -nr 's/^root(.*)/====iiii====\nroot\1/p' test
   ====iiii====
   root:x:0:0:root:/root:/bin/bash
   ......
- 在匹配行首插入字符串
bash
   [laoma@shell ~]$ sed -nr 's/^root/haharoot/p' test
   haharoot:x:0:0:root:/root:/bin/bash
- 在匹配行尾插入字符串
bash
   [laoma@shell ~]$ sed -nr 's/^root(.*)/root\1heihei/p' test
   root:x:0:0:root:/root:/bin/bashheihei
- 在特定字符串前插入字符串
bash
   [laoma@shell ~]$ sed -nr 's/root/laoma-root/gp' test
   laoma-root:x:0:0:laoma-root:/laoma-root:/bin/bash
- 在特定字符串后插入字符串
bash
   [laoma@shell ~]$ sed -nr 's/root/root-laoma/gp' test
   root-laoma:x:0:0:root-laoma:/root-laoma:/bin/bash
删除(重要)
作用
- d,删除模式空间所有记录。
- D,删除模式空间第一行记录。
语法
d 格式:[address1[,address2]]d
D 格式:[address1[,address2]]D
address1和address2分别是 起始地址 和 结束地址,可以是 行号或 模式字符串。address1和address2都是可选参数,可以都不填,这时候就是删除所有行,从文件的开头到文件结束。- 如果存在一个,那么就是删除 单行。也就是只删除
address1指定的那行。 d命令仅从 模式缓冲区 中删除行,也就是该行不会发送到输出流,原始文件保持不变。
d 删除 示例
示例1: 删除1-14行
[laoma@shell ~]$ sed -e '1,14d' test
@zhangying:*:1004:1004::/home/test:/bin/bash
policykit:x:102:1005:Po
示例2: 删除4以后的行,包括第4行,把$当成最大行数就行了。
[laoma@shell ~]$ sed -e '4,$d' test
root:x:0:0:root:/root:/bin/bash
bin:x:1:1:bin:/bin:/bin/false
daemon:x:2:2:daemon:/sbin:/bin/false
示例3: 删除包括false的行,或者包括bash的行,别忘了加\
[laoma@shell ~]$ sed -re '/(false|bash)/d' test
policykit:x:102:1005:Po
示例4: 删除从匹配root的行,到匹配以test开头的行,中间的行
[laoma@shell ~]$ sed -e '/root/,/^test/d' test
@zhangying:*:1004:1004::/home/test:/bin/bash
policykit:x:102:1005:Po
思考:是否使用使用 s 命令实现删除
- 删除特定行
bash
   [laoma@shell ~]$ sed -r 's/.*root.*$//;/^$/d' test
- 删除特定字符串
bash
   [laoma@shell ~]$ sed -nr 's/^root//gp' test
   :x:0:0:root:/root:/bin/bash
D 删除 示例
删除当前模式空间开端至\n的内容,放弃之后的命令,对剩余模式空间继续执行sed。
示例1:读取最后一行内容
[laoma@shell ~]$ echo 'This is 1
This is 2
This is 3
This is 4
This is 5' | sed 'N;D'
## 输出内容
This is 5
说明:
- 读取
This is 1,执行N,得出This is 1\nThis is 2\n,执行D。 - 读取
This is 3,执行N,得出This is 3\nThis is 4\n,执行D。 - 读取
This is 5,执行N,后续无内容,读取失败,放弃后续命令,正常打印This is 5
示例2:删除偶数行
[laoma@shell ~]$ echo 'This is 1
This is 2
This is 3
This is 4
This is 5' | sed 'n;D'

## 输出内容
This is 1
This is 3
This is 5
说明:
- 读取
This is 1,执行n,This is 2\n覆盖This is 1\n,执行D删除This is 2\n,This is 1\n没有删除,正常打印This is 1。 - 读取
This is 3,执行n,This is 4\n覆盖This is 3\n,执行D删除This is 4\n,正常打印This is 3。 - 读取
This is 5,执行n,后续无内容,读取失败,放弃后续命令,正常打印This is 5
打印行号
=
示例1:
[laoma@servera ~]$ sed '=' test
1
root:x:0:0:root:/root:/bin/bash
2
bin:x:1:1:bin:/bin:/bin/false
3
daemon:x:2:2:daemon:/sbin:/bin/false
......
[laoma@servera ~]$ sed '=' test| sed 'N;s/\n/:/'
1:root:x:0:0:root:/root:/bin/bash
2:bin:x:1:1:bin:/bin:/bin/false
3:daemon:x:2:2:daemon:/sbin:/bin/false
......
大小写转换
y 字符
[laoma@shell ~]$ echo 'This is 1
This is 2
This is 3
This is 4
This is 5' | sed 'y/si/SI/'

## 将小写字母s和i转换成大写字母S和I
ThIS IS 1
ThIS IS 2
ThIS IS 3
ThIS IS 4
ThIS IS 5
读取
示例: 读取test2的内容,并将其写入到匹配行的下面
[laoma@shell ~]$ vim test2
=============
-------------
+++++++++++++

[laoma@shell ~]$ sed -e '/^root/r test2' test
root:x:0:0:root:/root:/bin/bash
=============
-------------
+++++++++++++
bin:x:1:1:bin:/bin:/bin/false
......
写入
w 写入
将模式空间中记录写入到文件中。
示例1: 将root开头的行,写入test3中
[laoma@shell ~]$ sed -n '/^root/w test3' test
[laoma@shell ~]$ cat test3
root:x:0:0:root:/root:/bin/bash
W 写入
将模式空间中第一条记录写入到文件中。
示例: 写入记录
## 小写w写入
[laoma@shell ~]$ vim scripts
1{
N
w write.log
}
[laoma@shell ~]$ sed -n -f scripts test

## 小写w写入包含模式中所有行
[laoma@shell ~]$ cat write.log
root:x:0:0:root:/root:/bin/bash
bin:x:1:1:bin:/bin:/bin/false

## 大写W写入只包含模式中第一行
[laoma@shell ~]$ vim scripts
1{
N
W write.log
}
[laoma@shell ~]$ sed -n -f scripts test
[laoma@shell ~]$ cat write.log
root:x:0:0:root:/root:/bin/bash
更改
整行替换。
示例:root开头行替换成hello
[laoma@shell ~]$ sed '/^root/chello' test
hello
bin:x:1:1:bin:/bin:/bin/false
daemon:x:2:2:daemon:/sbin:/bin/false
......

## 等效下面命令
[laoma@shell ~]$ sed 's/^root.*/hello/' test
多命令执行 {} 和-f 选项
对匹配的内容执行多个命令。
示例1: 打印前两行
[laoma@shell ~]$ echo 'This is 1
This is 2
This is 3' | sed -n '1{N;p}'

## 输出结果
This is 1
This is 2
示例2: 替换并打印
[laoma@shell ~]$ sed -n '1,5{s/^root/hello/;p}' test
hello:x:0:0:root:/root:/bin/bash
bin:x:1:1:bin:/bin:/bin/false
daemon:x:2:2:daemon:/sbin:/bin/false
mail:x:8:12:mail:/var/spool/mail:/bin/false
ftp:x:14:11:ftp:/home/ftp:/bin/false
示例3: 多个命令写成脚本
## 小写w写入
[laoma@shell ~]$ vim scripts
1{
N
w write.log
}
[laoma@shell ~]$ sed -n -f scripts test

## 小写w写入包含模式中所有行
[laoma@shell ~]$ cat write.log
root:x:0:0:root:/root:/bin/bash
bin:x:1:1:bin:/bin:/bin/false
退出
示例1:打印前2行
[laoma@shell ~]$ sed '2q' test
root:x:0:0:root:/root:/bin/bash
bin:x:1:1:bin:/bin:/bin/false
示例2: 3q的意思是到第三行的时候,退出
[laoma@shell ~]$ sed -e 's/bin/tank/g;3q' test
root:x:0:0:root:/root:/tank/bash
tank:x:1:1:tank:/tank:/tank/false
daemon:x:2:2:daemon:/stank:/tank/false

## 等效于
[laoma@shell ~]$ sed -ne '1,3s/bin/tank/gp' test
root:x:0:0:root:/root:/tank/bash
tank:x:1:1:tank:/tank:/tank/false
daemon:x:2:2:daemon:/stank:/tank/false
! 匹配取反
表示后面的命令作用于所有没有被选定的行。
示例:打印非root开头的行
[laoma@shell ~]$ sed -n '/^root/!p' test
示例8: h的作用是将找到的行,放到一个缓存区,G 的作用是将缓存区中的内容放到最后一行
[laoma@shell ~]$ sed -e '/root/h' -e '$G' test
root:x:0:0:root:/root:/bin/bash
bin:x:1:1:bin:/bin:/bin/false
......
policykit:x:102:1005:Po
root:x:0:0:root:/root:/bin/bash
示例9: 行替换,用匹配root的行,来替换匹配zhangy的行
[laoma@shell ~]$ sed -e '/root/h' -e '/zhangy/g' test
root:x:0:0:root:/root:/bin/bash
......
&nobody:$:99:99:nobody:/:/bin/false
root:x:0:0:root:/root:/bin/bash
http:x:33:33::/srv/http:/bin/false
......
aaa:x:1001:1001::/home/aaa:/bin/bash
root:x:0:0:root:/root:/bin/bash
test:x:1003:1003::/home/test:/bin/bash
root:x:0:0:root:/root:/bin/bash
policykit:x:102:1005:Po
正则用法
示例1: sed中正则表达式需要转移字符\,例如,用括号要加上 \ ,不然会报错。
[laoma@shell ~]$ sed -ne '2,8s/^\(zhangy\)/zhangying/gp' test
zhangying:x:1000:100:,,,:/home/zhangy:/bin/bash
示例2:使用 -r 选项不需要转义字符。
[laoma@shell ~]$ sed -nre '2,8s/^(zhangy)/zhangying/gp' test
zhangying:x:1000:100:,,,:/home/zhangy:/bin/bash
子串使用
- (),用于匹配子串
- \N,N是个数字,代表前面匹配的第N个子串
- &,代表匹配的所有内容
[laoma@shell ~]$ egrep 'ba.*zhang' test
ba:x:1002:1002::/home/zhangy:/bin/bash

[laoma@shell ~]$ sed -nre 's/(ba).*(zhangy)/\1/gp' test
ba:/bin/bash

[laoma@shell ~]$ sed -nre 's/(ba).*(zhangy)/&,haha/gp' test
ba:x:1002:1002::/home/zhangy,haha:/bin/bash
g G h G
前文我们讨论过:
-
pattern space空间是 sed 在内存中开辟的一个私有的存储区域。 -
sed 还在内存上开辟了另一个私有的空间
hold space用于保存处理后的数据以供以后检索。每一个周期执行结束,sed 会清空pattern space内容,但hold space内容并不会清空。hold space用于存储处理后数据,sed 命令并不会对这里的数据处理。
这样,当 sed 需要之前处理后的数据时,可以随时从 hold space 读取。
我们可以这样理解:
- pattern space,看成是一个流水线,所有的动作都是在“流水线”上执行的。
- hold space,是一个“仓库”,“流水线”上的东西存存放到这里。
下面我们来解释以下指令:
- g:清除pattern space里的内容,拷贝hold space中的内容到pattern space中
- G:将hold space中的内容append到pattern space\n后
- h:清除hold space里的内容,拷贝pattern space中的内容到hold space中
- H:将pattern space中的内容append到hold space\n后
示例:在每一行后面增加一空行
[laoma@shell ~]$ sed 'G' test
root:x:0:0:root:/root:/bin/bash

bin:x:1:1:bin:/bin:/bin/false

daemon:x:2:2:daemon:/sbin:/bin/false
......
列表
l,列表不能打印字符的清单。
sed 命令模式中命令
- #,把注释扩展到下一个换行符以前。
自动同步windows文件到阿里云服务器
需求
windows中编写markdown格式的随堂笔记,每次修改完成需要完成以下工作:
- 自动转换成html格式
- 实现每隔1秒自动上传到阿里云服务器
实现
自动转换成html格式
- markdown文件自动保存,配置typora自动保存、
- 使用 python 代码实现监控文件变化,并进行转换。
import tkinter as tk
from tkinter import ttk
import markdown
import os
from datetime import datetime
from watchdog.observers import Observer
from watchdog.events import FileSystemEventHandler
import threading

# 全局变量控制监控状态
monitoring = False
observer = None
monitor_thread = None


# 自定义文件监控事件处理器
class MDFileHandler(FileSystemEventHandler):
    def __init__(self, default_html_dir):
        self.default_html_dir = default_html_dir

    def on_modified(self, event):
        """文件修改时触发"""
        if not event.is_directory and event.src_path.endswith('.md'):
            # 过滤.~开头的临时文件
            filename = os.path.basename(event.src_path)
            if filename.startswith('.~'):
                return
            self.convert_md(event.src_path)

    def on_created(self, event):
        """文件新建时触发"""
        if not event.is_directory and event.src_path.endswith('.md'):
            # 过滤.~开头的临时文件
            filename = os.path.basename(event.src_path)
            if filename.startswith('.~'):
                return
            self.convert_md(event.src_path)

    def convert_md(self, md_path):
        """自动转换md文件为html"""
        # 生成对应的html路径(同目录同文件名,后缀替换为html)
        html_path = os.path.splitext(md_path)[0] + '.html'

        try:
            # 读取md文件
            with open(md_path, 'r', encoding='utf-8') as f:
                md_content = f.read()

            # 转换配置
            extensions = ['extra', 'tables', 'fenced_code', 'sane_lists', 'nl2br']
            html_body = markdown.markdown(md_content, extensions=extensions)

            # 生成完整HTML
            html_full = f'''<!DOCTYPE html>
<html lang="zh-CN">
<head>
    <meta charset="UTF-8">
    <title>笔记</title>
    <style>
        body {{ font-family: "Microsoft YaHei"; margin: 25px; line-height: 1.8; font-size: 15px; }}
        li {{ margin: 6px 0; line-height: 1.6; }}
        ul, ol {{ padding-left: 25px; margin: 10px 0; }}
        code {{ background:#f4f4f4; padding:2px 4px; border-radius:3px; }}
        pre {{ background:#f9f9f9; padding:10px; border-radius:5px; overflow:auto; }}
        table {{ border-collapse:collapse; width:100%; margin:10px 0; }}
        th,td {{ border:1px solid #ddd; padding:8px; }}
    </style>
</head>
<body>
{html_body}
</body>
</html>'''

            # 写入html文件
            with open(html_path, 'w', encoding='utf-8') as f:
                f.write(html_full)

            # 记录日志
            md_dir = os.path.dirname(md_path)
            md_filename = os.path.basename(md_path)
            html_filename = os.path.basename(html_path)
            now = datetime.now().strftime("%Y-%m-%d %H:%M:%S")
            log_msg = f"[{now}] 自动转换:{md_dir} 下 {md_filename} -> {html_filename}\n"

            # 主线程更新日志
            log_text.config(state=tk.NORMAL)
            log_text.insert(tk.END, log_msg)
            log_text.see(tk.END)
            log_text.config(state=tk.DISABLED)

        except Exception as e:
            now = datetime.now().strftime("%Y-%m-%d %H:%M:%S")
            err_msg = f"[{now}] 自动转换失败:{str(e)}\n"
            log_text.config(state=tk.NORMAL)
            log_text.insert(tk.END, err_msg)
            log_text.see(tk.END)
            log_text.config(state=tk.DISABLED)


def convert_md_to_html():
    """手动转换指定md文件"""
    md_path = entry_md.get().strip()
    html_path = entry_html.get().strip()

    # 过滤.~开头的临时文件
    md_filename = os.path.basename(md_path)
    if md_filename.startswith('.~'):
        now = datetime.now().strftime("%Y-%m-%d %H:%M:%S")
        err_msg = f"[{now}] 转换失败:不支持转换.~开头的临时文件\n"
        log_text.config(state=tk.NORMAL)
        log_text.insert(tk.END, err_msg)
        log_text.see(tk.END)
        log_text.config(state=tk.DISABLED)
        return

    # 校验文件
    if not os.path.isfile(md_path):
        now = datetime.now().strftime("%Y-%m-%d %H:%M:%S")
        err_msg = f"[{now}] 转换失败:Markdown 文件不存在\n"
        log_text.config(state=tk.NORMAL)
        log_text.insert(tk.END, err_msg)
        log_text.see(tk.END)
        log_text.config(state=tk.DISABLED)
        return

    try:
        # 读取文件
        with open(md_path, 'r', encoding='utf-8') as f:
            md_content = f.read()

        # 转换配置
        extensions = ['extra', 'tables', 'fenced_code', 'sane_lists', 'nl2br']
        html_body = markdown.markdown(md_content, extensions=extensions)

        # 生成HTML
        html_full = f'''<!DOCTYPE html>
<html lang="zh-CN">
<head>
    <meta charset="UTF-8">
    <title>笔记</title>
    <style>
        body {{ font-family: "Microsoft YaHei"; margin: 25px; line-height: 1.8; font-size: 15px; }}
        li {{ margin: 6px 0; line-height: 1.6; }}
        ul, ol {{ padding-left: 25px; margin: 10px 0; }}
        code {{ background:#f4f4f4; padding:2px 4px; border-radius:3px; }}
        pre {{ background:#f9f9f9; padding:10px; border-radius:5px; overflow:auto; }}
        table {{ border-collapse:collapse; width:100%; margin:10px 0; }}
        th,td {{ border:1px solid #ddd; padding:8px; }}
    </style>
</head>
<body>
{html_body}
</body>
</html>'''

        # 写入文件
        with open(html_path, 'w', encoding='utf-8') as f:
            f.write(html_full)

        # 日志格式
        md_dir = os.path.dirname(md_path)
        md_filename = os.path.basename(md_path)
        html_filename = os.path.basename(html_path)
        now = datetime.now().strftime("%Y-%m-%d %H:%M:%S")
        log_msg = f"[{now}] 手动转换:{md_dir} 下 {md_filename} -> {html_filename}\n"

        # 追加日志
        log_text.config(state=tk.NORMAL)
        log_text.insert(tk.END, log_msg)
        log_text.see(tk.END)
        log_text.config(state=tk.DISABLED)

    except Exception as e:
        now = datetime.now().strftime("%Y-%m-%d %H:%M:%S")
        err_msg = f"[{now}] 转换失败:{str(e)}\n"
        log_text.config(state=tk.NORMAL)
        log_text.insert(tk.END, err_msg)
        log_text.see(tk.END)
        log_text.config(state=tk.DISABLED)


def toggle_monitoring():
    """切换监控状态(开始/停止转换)"""
    global monitoring, observer, monitor_thread

    if not monitoring:
        # 开始监控
        monitoring = True
        btn_convert.config(text="停止转换")

        # 获取监控目录(从md路径中提取目录)
        md_dir = os.path.dirname(entry_md.get().strip())
        if not os.path.isdir(md_dir):
            now = datetime.now().strftime("%Y-%m-%d %H:%M:%S")
            err_msg = f"[{now}] 监控失败:目录不存在 {md_dir}\n"
            log_text.config(state=tk.NORMAL)
            log_text.insert(tk.END, err_msg)
            log_text.see(tk.END)
            log_text.config(state=tk.DISABLED)
            monitoring = False
            btn_convert.config(text="开始转换")
            return

        # 初始化监控器
        event_handler = MDFileHandler(md_dir)
        observer = Observer()
        observer.schedule(event_handler, path=md_dir, recursive=False)

        # 启动监控线程(避免阻塞UI)
        monitor_thread = threading.Thread(target=observer.start, daemon=True)
        monitor_thread.start()

        # 记录日志
        now = datetime.now().strftime("%Y-%m-%d %H:%M:%S")
        log_msg = f"[{now}] 开始监控目录:{md_dir}(MD文件变动将自动转换)\n"
        log_text.config(state=tk.NORMAL)
        log_text.insert(tk.END, log_msg)
        log_text.see(tk.END)
        log_text.config(state=tk.DISABLED)

    else:
        # 停止监控
        monitoring = False
        btn_convert.config(text="开始转换")

        if observer:
            observer.stop()
            observer.join()
            observer = None

        # 记录日志
        now = datetime.now().strftime("%Y-%m-%d %H:%M:%S")
        log_msg = f"[{now}] 已停止监控\n"
        log_text.config(state=tk.NORMAL)
        log_text.insert(tk.END, log_msg)
        log_text.see(tk.END)
        log_text.config(state=tk.DISABLED)


# ==================== 界面 ====================
if __name__ == "__main__":
    root = tk.Tk()
    root.title("Markdown 转 HTML 工具(自动监控版)")
    root.geometry("720x400")
    root.resizable(False, False)

    # 自动获取当天日期(月日)
    today = datetime.now().strftime("%m%d")
    DEFAULT_MD = fr"E:\website\00.随堂笔记\随堂笔记-{today}.md"
    DEFAULT_HTML = fr"E:\website\00.随堂笔记\随堂笔记-{today}.html"

    # 路径输入
    ttk.Label(root, text="1. Markdown 文件路径:").grid(row=0, column=0, padx=15, pady=15, sticky="w")
    entry_md = ttk.Entry(root, width=68)
    entry_md.grid(row=0, column=1, padx=15, pady=15)
    entry_md.insert(0, DEFAULT_MD)

    ttk.Label(root, text="2. 输出 HTML 路径:").grid(row=1, column=0, padx=15, pady=15, sticky="w")
    entry_html = ttk.Entry(root, width=68)
    entry_html.grid(row=1, column=1, padx=15, pady=15)
    entry_html.insert(0, DEFAULT_HTML)

    # 转换/监控按钮
    btn_convert = ttk.Button(root, text="开始转换", command=toggle_monitoring)
    btn_convert.grid(row=2, column=0, columnspan=2, pady=10)
    btn_convert.config(width=30)

    # 日志区域
    ttk.Label(root, text="📝 转换日志:").grid(row=3, column=0, columnspan=2, padx=15, sticky="w")
    log_text = tk.Text(root, height=8, width=85, font=("Microsoft YaHei", 10))
    log_text.grid(row=4, column=0, columnspan=2, padx=15, pady=10)
    log_text.config(state=tk.DISABLED)


    # 关闭窗口时停止监控
    def on_closing():
        global monitoring, observer
        if monitoring and observer:
            observer.stop()
            observer.join()
        root.destroy()


    root.protocol("WM_DELETE_WINDOW", on_closing)
    root.mainloop()
- python 代码编译成 exe 文件。
自动上传
使用CentOS 7 系统实现实时同步。
数据一致
随便笔记文件在windows,CentOS 7 是vmware虚拟机,配置虚拟机启用共享目录确保内容实时一致。
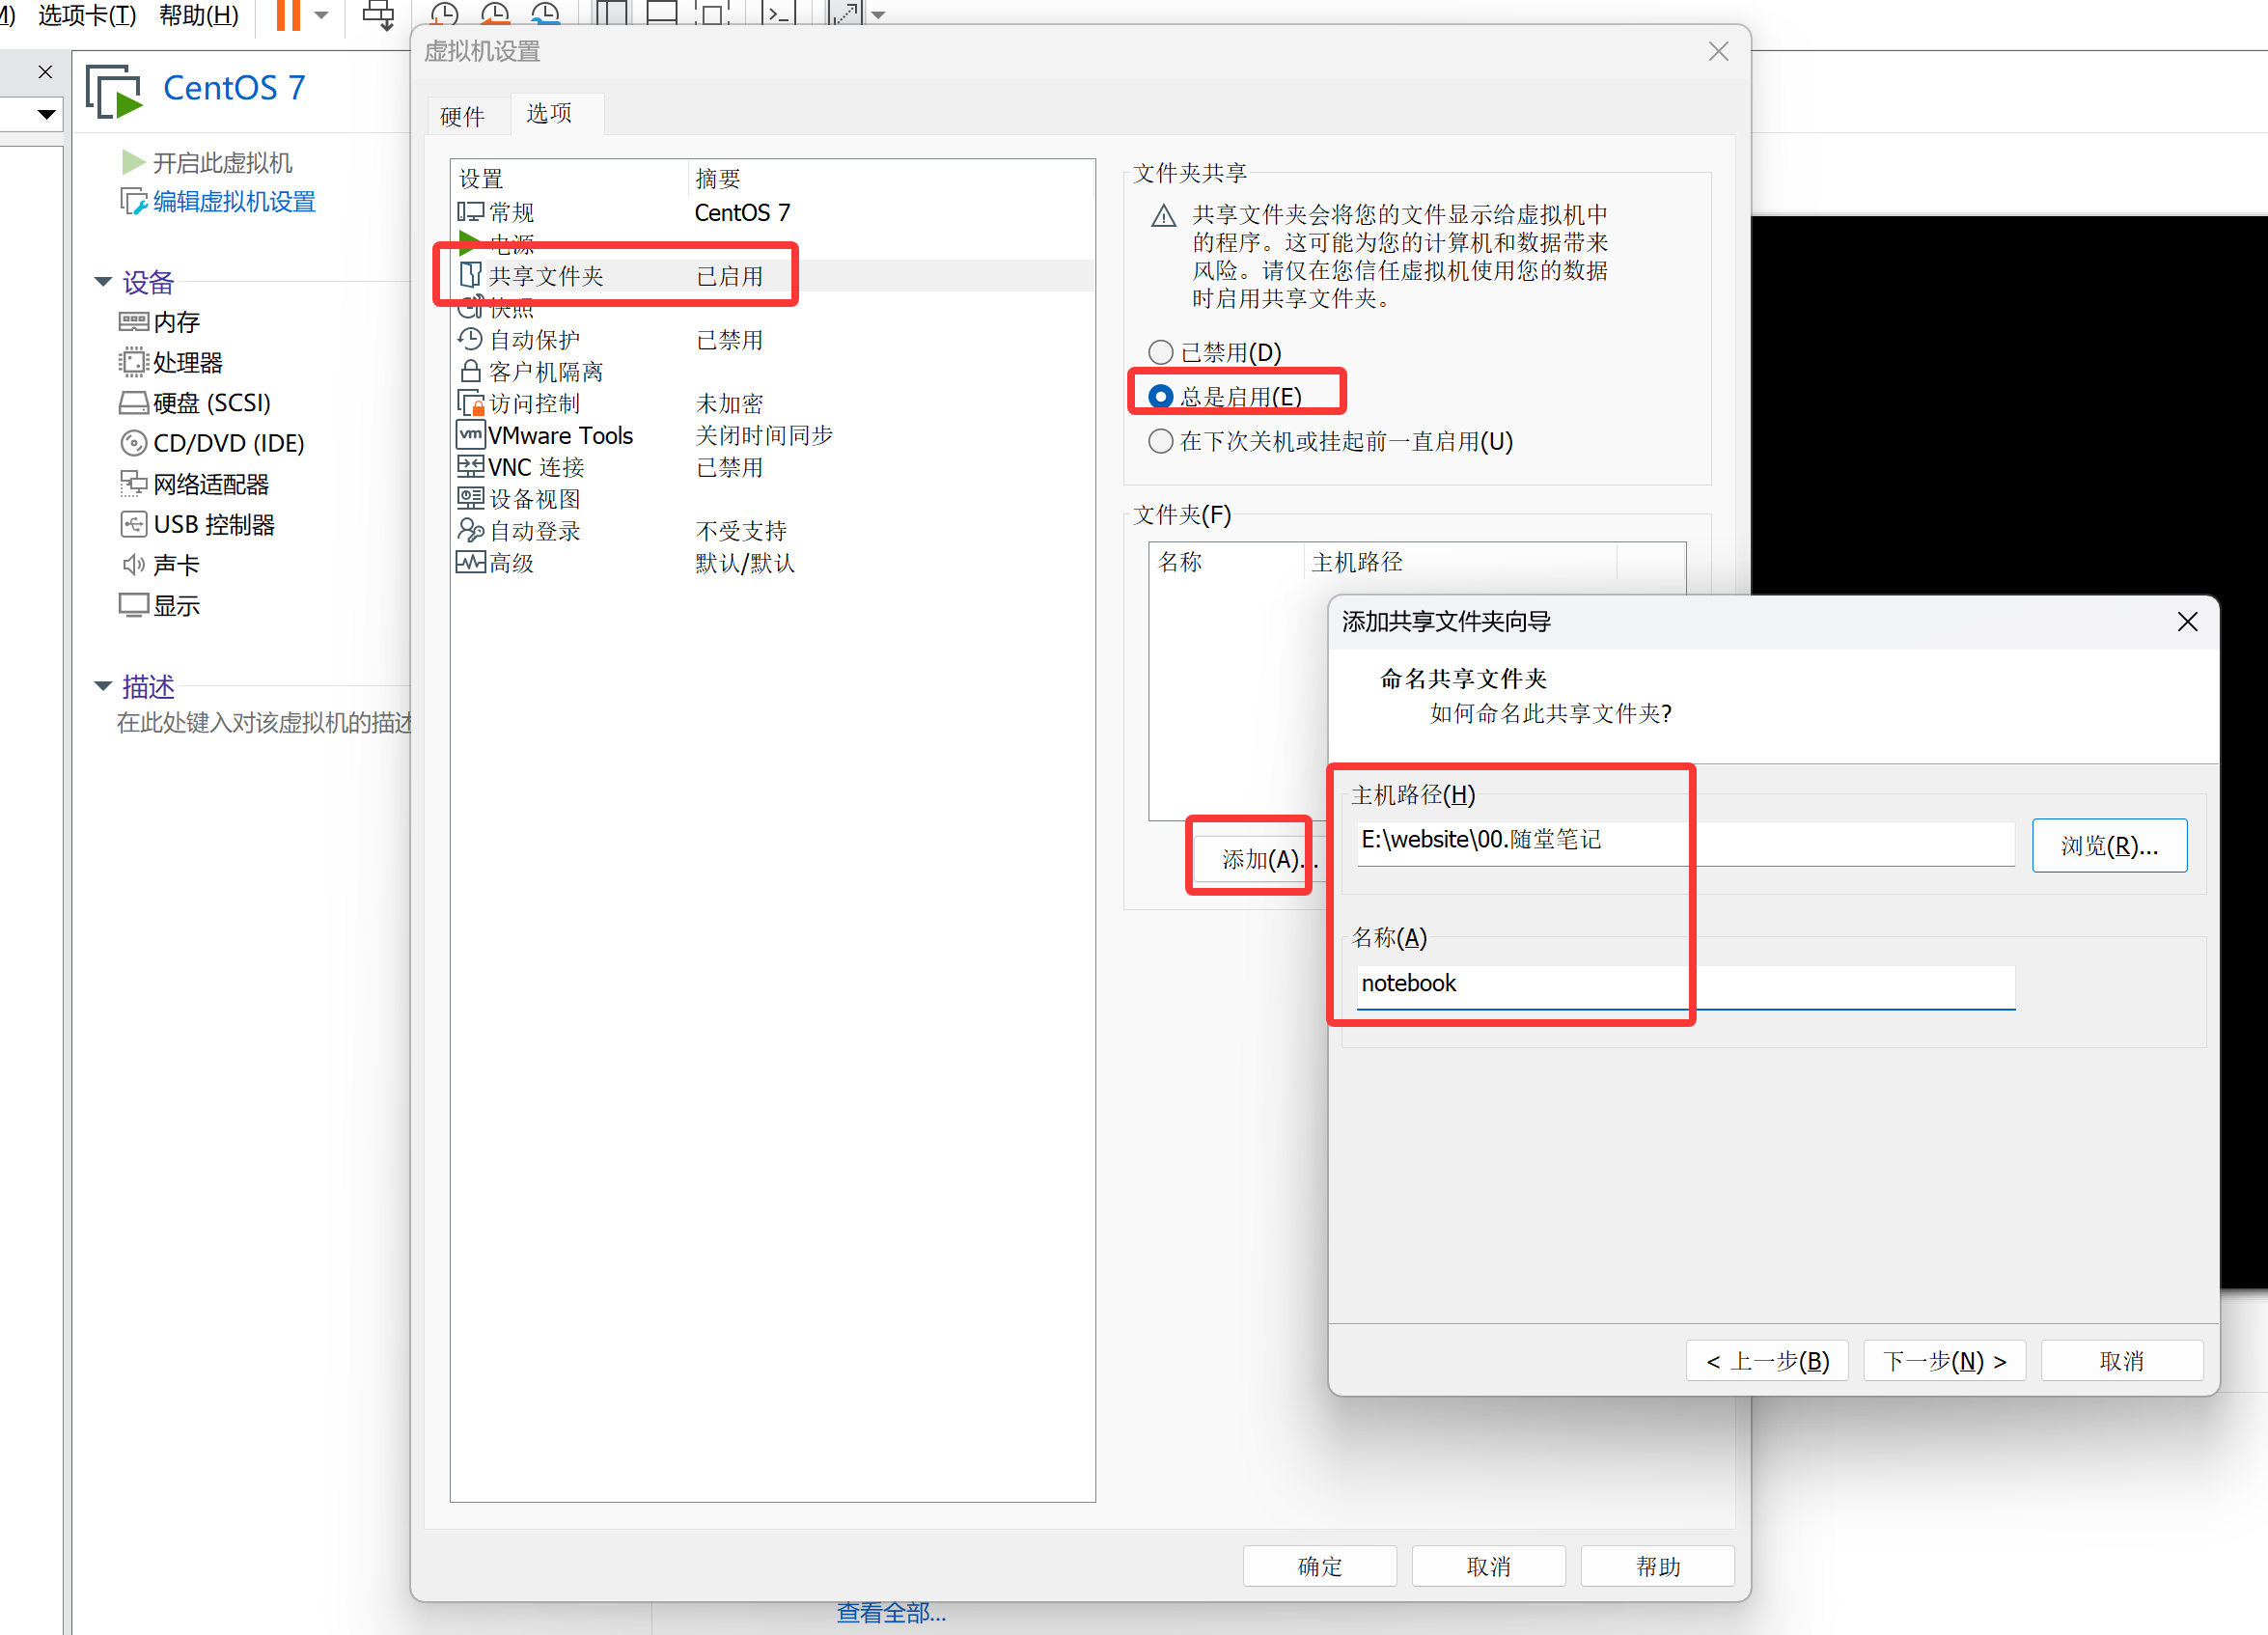
挂载共享
# 安装虚拟化工具
[root@shell ~ 10:43:25]# yum install -y open-vm-tools

# 查看共享
[root@shell ~ 10:45:39]# vmware-hgfsclient
notebook

# 创建挂载点并挂载
[root@shell ~ 10:46:58]# mkdir /notebook
[root@shell ~ 10:47:06]# vmhgfs-fuse .host:/notebook /notebook
[root@shell ~ 10:47:24]# df -h /notebook
Filesystem      Size  Used Avail Use% Mounted on
vmhgfs-fuse     1.3T  985G  324G  76% /notebook

# 配置持久化挂载
[root@shell ~ 10:48:26]# echo '.host:/notebook /notebook fuse.vmhgfs-fuse defaults 0 0' >> /etc/fstab

# 验证持久化挂载
[root@shell ~ 10:48:17]# umount /notebook
[root@shell ~ 10:48:21]# mount /notebook
[root@shell ~ 10:48:24]# df -h /notebook
Filesystem      Size  Used Avail Use% Mounted on
vmhgfs-fuse     1.3T  985G  324G  76% /notebook
实时上传
CentOS 7 系统实现方式:
- 使用crond服务实现,缺点分钟级别,实时行无法满足要求。
- 使用脚本实现,实现秒级别上传。
配置CentOS 7 系统免密登录阿里云服务器。
[root@shell ~]# ssh-keygen -t rsa -N '' -f id_rsa
[root@shell ~]# ssh-copy-id root@www.laoma.cloud
[root@shell ~]# ssh root@www.laoma.cloud hostname
www.laoma.cloud
开发同步脚本:
[root@shell ~ 11:16:53]# vim /usr/local/bin/sync_notebook.sh
#!/bin/bash
sync_log_file=/var/log/sync_notebook.log
while true
do
  echo -e "\n========================================" >> ${sync_log_file}
  date >> ${sync_log_file}
  rsync -av /notebook/ root@www.laoma.cloud:/usr/share/nginx/html/documents/02.随堂笔记/ >> ${sync_log_file}
  sleep 1
done
[root@shell ~ 11:17:52]# chmod +x /usr/local/bin/sync_notebook.sh
[root@shell ~ 11:17:52]# /usr/local/bin/sync_notebook.sh &
[1] 1940


# 监控日志
[root@shell ~ 11:20:34]# tail -f /var/log/sync_notebook.log
========================================
Tue Apr 14 11:20:43 CST 2026
sending incremental file list

sent 1,403 bytes  received 18 bytes  406.00 bytes/sec
total size is 7,460,096  speedup is 5,249.89

========================================
Tue Apr 14 11:20:47 CST 2026
sending incremental file list
./
随堂笔记-0414.html
随堂笔记-0414.md

sent 2,852 bytes  received 585 bytes  1,374.80 bytes/sec
total size is 7,460,214  speedup is 2,170.56

========================================
Tue Apr 14 11:20:51 CST 2026
sending incremental file list

sent 1,403 bytes  received 18 bytes  568.40 bytes/sec
total size is 7,460,214  speedup is 5,249.97
......
设置程序开机自动启动
CentOS7系统启动是会自动执行/etc/rc.d/rc.local脚本中代码。
[root@shell ~ 11:27:32]# echo '/usr/local/bin/sync_notebook.sh &' >> /etc/rc.d/rc.local
[root@shell ~ 11:27:53]# chmod +x /etc/rc.d/rc.local
AI 提示词
自动转换
使用python开发一个工具实现:支持实时监控目录中.md结尾的文件变化,一旦文件有变动就自动转换成html格式。
python 项目目录:C:\Users\laoma\PycharmProjects\webapp。
文件变化判定标准:
- 文件修改时间变化
- 文件大小变化
- 其他变化你来补充
软件运行环境:
- 操作系统:windows 11 专业版
工具的UI界面排版:
- 采用上下排版
- 上面是配置,下面是日志
工具的UI界面提供以下参数设置:
- 软件窗口标题末尾添加(老马专用)
- Markdown 文件路径:默认值为 E:\website\00.随堂笔记
- 输出 HTML 路径:E:\website\00.随堂笔记
- 提供 开始实时转换 按钮,点击 开始实时转换 按钮后进行实时转换,按钮变更为 停止实时转换 按钮。点击 停止实时转换 按钮后停止实时转换,按钮变更为 开始实时转换。
- 最下方提供转换日志,日志中显示具体转换了哪些文件,每个文件占用一行记录。
自动上传
使用python开发一个工具实现:实时同步变化文件到远端服务器。
python 项目目录:C:\Users\laoma\PycharmProjects\webapp。
目录变化判定标准:
- 目录及其子目录中新增文件(或目录)或删除文件(或目录)
- 文件修改时间变化
- 文件大小变化
- 其他变化你来补充
软件运行环境:
- 本地系统:windows 11 专业版
- 远端:CentOS 7 系统、开启了sshd 服务、只支持秘钥登录
工具的UI界面排版:
- 采用上下排版
- 上面是配置,下面是日志
工具的UI界面提供以下参数设置:
-
监控目录:默认值为 E:\website\00.随堂笔记
-
服务器地址: 默认值为 www.laoma.cloud
-
用户名: 默认值为 root
-
使用秘钥登录,提示词为私钥文件,私钥文件默认放置在python项目目录下:
C:\Users\laoma\PycharmProjects\webapp\aliyun-ssh-KeyPair-www.pem
方便后续将python代码打包为exe文件。
-
同步到服务器目录:默认值为 /usr/share/nginx/html/documents/02.随堂笔记/
-
同步时不要删除目标服务器中多余的文件。
-
不要每次全量同步,支持增量同步。
-
提供 测试连接 按钮、用于测试服务器连接性。测试连接结果显示在日志中,不需要弹出窗口。
-
提供 开始实时同步 按钮,点击 开始实时同步 按钮后进行实时同步,按钮变更为 停止实时同步 按钮。点击 停止实时同步 按钮后停止实时同步,按钮变更为 开始实时同步。
-
最下方提供同步日志,日志中显示具体同步了哪些文件,每个文件占用一行记录。
-
不同步.md结尾的文件。